A dark root isn’t always something you need to hide. In the right shade, it can make lighter hair look richer, softer, and more dimensional.
That’s the idea behind shadow roots, where a deeper tone is placed near the part and softly blended into the lengths.
I’ve always found that the prettiest results come from keeping the change subtle rather than trying to create a dramatic contrast.
The tricky part is knowing which shade will actually work with your hair and how to blend it without leaving a noticeable line.
What are Shadow Roots?
Shadow roots are a coloring technique in which a stylist applies a deeper shade near your natural part, then blends it down into lighter lengths below.
Some people know this as root shadowing, since the idea is to shadow the regrowth rather than eliminate it outright.
Rather than fixing regrowth with an exact match to your base color, the goal is a soft, gradual fade instead of a hard line. This differs from a traditional root touch-up, which recolors new growth to match what’s already there.
A root smudge technique is similar in concept but uses a lighter hand and less product, mainly for freshly colored hair that needs a quick softening.
Balayage focuses on hand-painted highlights throughout the lengths, while traditional highlights create defined streaks with foils. Shadow roots work with either technique, giving your grow-out a natural, lived-in look as it grows.
What You Need to Create Shadow Roots at Home
Trying this at home means gathering a few things beforehand, since rushing the process is where most root shadowing mistakes happen.
| Category | Details |
|---|---|
| Hair color and developer | Choose a shade close to your natural hair color rather than something drastically different. A demi-permanent color blends softer than permanent dye, which matters most near the root line. Stick to a low-volume developer, since roots process faster than lengths. |
| Tools | Tint brush, mixing bowl, gloves, hair clips, comb, timer, and an old towel or cape to protect your clothes. |
Before you start: The FDA recommends doing a patch test a couple of days ahead to rule out a reaction. Check that your hair is in decent condition first, and skip this process entirely if it’s damaged or overprocessed, since color grabs unevenly and can cause more breakage.
Once everything is laid out and within reach, you’re ready to start mixing and applying.
How to Create Shadow Roots Step by Step
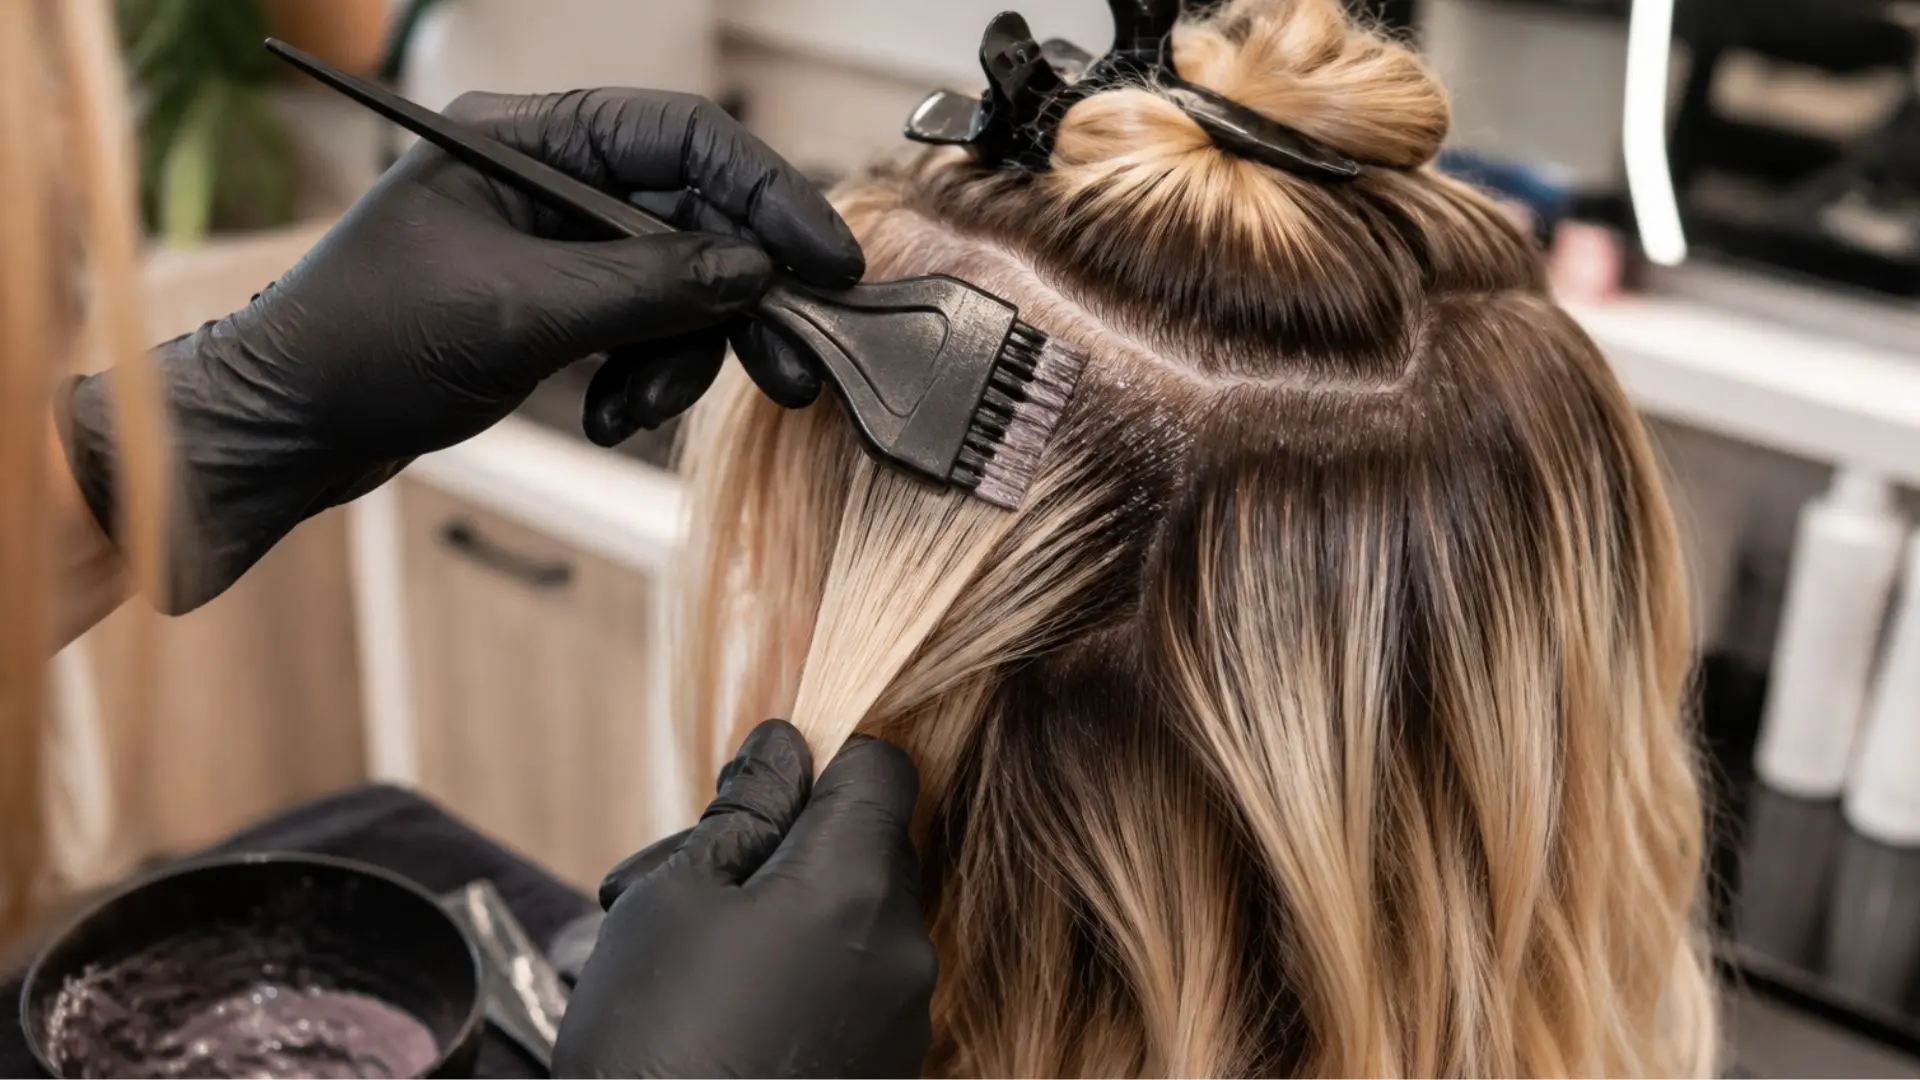
Once you have your tools and shade ready, the actual process moves fairly quickly if you work through it in order.
Step 1: Choose the Right Shadow Root Shade
Match your shade to your natural root color rather than guessing. Look at your current hair tone and how much contrast you actually want against your lengths.
Going too dark creates a harsh line instead of a soft fade, so when unsure, pick a shade lighter than you think you need.
If you’re unsure where your natural shade even falls, a hair color level chart makes it much easier to compare against before you commit to a shade.
On my own hair, I stick to a shade that’s just one level off my natural root color, nothing more.
I went two shades darker the first time I tried this and regretted it almost immediately, since it sat like a cap on top of my head instead of fading into anything.
Since then, I always size down when I’m unsure, and it has never once looked wrong the way going too dark did.
Step 2: Prepare Your Hair and Workspace
Start on dry, fully detangled hair, since wet hair changes how color grabs. Section your hair into four or more manageable parts using clips.
Lay down towels and wear an old shirt or cape, since root color stains fabric and skin fast.
I do this over my bathroom sink with an old towel around my shoulders, since a proper cape always ends up shifting halfway through.
Step 3: Mix and Apply the Root Color
Mix your color and developer right before applying, not ahead of time. Apply only to the root area, about one to three inches from your part, working in small sections so no spot gets missed or double-coated.
Working alone, I apply in smaller sections than I think I need, since it’s easy to rush the back of your head when you can’t fully see it.
I mix just enough color for one section at a time now, because letting a full batch sit in the bowl while I work through my whole head made the last sections process differently than the first.
Step 4: Blend the Color Into the Mid-Lengths
Right after applying the root color, use a comb or your fingers to pull a small amount downward.
This softens the boundary instead of leaving a visible line. Focus on gradually feathering the color rather than stopping abruptly at one point.
If you want the transition to extend even further down the shaft, that heavier version of this technique is called a root melt.
Step 5: Process and Rinse the Color
Follow the timing listed on your product box, and check the color at the earliest recommended mark rather than waiting until the end.
Once it matches what you want, rinse thoroughly and switch to color-safe shampoo and conditioner right away.
I set a timer for the earliest mark listed and check a small piece near my part first, since that section always grabs color fastest on my hair.
Tips for Getting a Natural-Looking Shadow Root
A few small adjustments make the difference between a shadow root that looks salon-done and one that looks obviously homemade.
- Test your color on a small, hidden section first, since color can look different once it dries than it did when wet or freshly rinsed.
- Keep the application soft around your hairline, since heavy color there creates an obvious band once it grows out slightly.
- Blend carefully around face-framing pieces, since these sit closest to your face and show unevenness faster than the rest.
- Avoid leaving a straight line between colors, since blending upward with a comb softens the edge into something gradual.
- Use a toner to correct tone when needed, especially if your lengths pull brassy or warm after processing.
Getting these details right takes a little extra patience, but it’s what makes the whole look read as intentional rather than accidental.
How Shadow Roots Work on Different Hair Colors
The shadow root technique works a little differently depending on your base color, since the goal is always the same blend, but the shade choices change based on what you’re starting from.
1. Shadow Roots on Blonde Hair

Darker roots against blonde lengths create the most noticeable contrast, which is exactly why this combination is so popular.
The depth near your part makes the blonde look more dimensional, not flat or one-note.
For ash blonde, a cool-toned brown root works best. Warmer, golden blondes pair well with a caramel or light chestnut shade, while platinum blonde looks most natural with a soft taupe or medium brown root, not anything too dark.
2. Shadow Roots on Brunette Hair

Brunette hair benefits from shadow roots too, but with less contrast. A shade just one or two tones deeper than your base color creates a seamless blend rather than an obvious line.
To avoid flatness, ask your stylist to add subtle warmth or richness to the root shade. Even a small tonal shift near your part adds depth without changing your overall color.
3. Shadow Roots on Gray or Silver Hair

Gray hair grows out differently, so shadow roots here focus on blending natural gray with colored sections rather than creating contrast. This makes the transition period far less noticeable as your hair grows.
Soft, muted shades close to your natural gray tone work best. Avoid anything too warm or dark, since the goal is a gradual, low-maintenance fade rather than a defined root line.
4. Fashion Colors with Shadow Roots

Pastel and vivid shades benefit from shadow roots too, since a deeper root adds contrast that pure pastel often lacks. Soft ash brown or taupe roots suit pastel pink or lilac, while near-black roots ground bolder shades like purple or teal.
One note: pastel and vivid color fades faster than the root shade, so you’ll likely refresh the length’s tone before the root needs touching up.
How Long Do Shadow Roots Last?
Shadow roots typically last eight to twelve weeks before needing a refresh, though this depends heavily on how fast your hair grows and which shade you chose.
Since root shadowing blends rather than fully covering regrowth, it naturally buys you more time between appointments than a traditional touch-up.
Lighter root colors show regrowth sooner than darker ones. A hair fiber study hosted on PMC also found that repeated dyeing causes measurable damage to hair strands over time, so keep that in mind if you color often.
Washing frequency plays a big role, since more washing means faster fading. Sulfate shampoos strip color quicker than gentle formulas. Heat styling breaks down color molecules over time, shortening how long your shadow root stays true.
Hair porosity matters too. Highly porous hair absorbs color fast but also releases it fast, while low porosity hair holds color longer with less noticeable fading.
Popular Blending Techniques
Shadow roots aren’t the only way to soften a grow-out, and knowing the other names floating around helps you avoid confusion at your next appointment.
| Technique | What It Does | Best For |
|---|---|---|
| Root Tap | Adds a small amount of color at the part. Reduces visible brightness without adding depth. | Softening exposed roots |
| Root Smudge | Blends the line between natural hair and highlights. Creates a smoother transition. | Hiding harsh highlight lines |
| Root Melt | Blends multiple tones from roots to mid-lengths. Creates the softest gradient. | A seamless, low-maintenance color blend |
Shadow roots sit in the middle of all this. The contrast is more intentional than a smudge, but the technique still relies on that same downward blending motion to avoid a hard edge.
Shadow Root vs. Root Smudge vs. Root Melt
Since these three get mixed up constantly, here’s how I keep them straight. A root smudge uses a shade close to your natural color and blends about half an inch to an inch down, mainly to erase a visible line.
A shadow root uses more contrast, usually one to three shades deeper, and extends the blend one to three inches from the scalp for a look that reads as intentional rather than accidental.
A root melt goes even further, blending multiple tones across a longer stretch of hair for the most gradual transition of the three.
The easiest way I explain it to people is this. A smudge softens, a shadow root deepens, and a melt stretches. All three exist to avoid the same thing: a stark line where your natural color meets your dye. Which one to ask for depends on how much contrast you want and how far down your hair you want that transition to travel.
Shadow Roots vs Other Root Blending Techniques
Several techniques create a similar blended effect, so here’s how shadow roots compare to the others.
| Technique | Main purpose | Best for |
|---|---|---|
| Shadow roots | Creates darker root depth | Low maintenance color |
| Root smudge | Softens the line between colors | Highlighted hair |
| Root melt | Blends multiple shades | Dimensional color |
| Balayage highlighting method | Creates natural lightness | Sun-kissed effects |
Choosing between these comes down to your current color, how much contrast you want, and how often you’re willing to visit the salon for upkeep.
Who Is a Good Candidate for Shadow Root Hair?
Shadow roots suit many hair types, but they work especially well for blondes, highlighted hair, and balayage. The darker root creates depth and helps soften the contrast between natural growth and lighter lengths.
Brunettes can also use this technique to blend face-framing pieces or add a more natural finish.
This color method is ideal for anyone who wants fewer salon visits, as it makes regrowth less noticeable over time. Hair with an even color history usually gives the best results.
However, damaged or overprocessed hair may absorb color unevenly. A stylist should check your hair condition before applying a shadow root.
How to Maintain Shadow Roots
A little upkeep between appointments goes a long way toward keeping your shadow root looking fresh instead of faded or patchy.
- Use sulfate-free or color-safe shampoos, since sulfates strip color molecules and can make your shadow root fade unevenly.
- Reduce excessive heat styling, since repeated heat exposure breaks down color faster and dulls the overall depth.
- Refresh your tone when needed, or look into a root cover-up if your regrowth needs coverage between color appointments, especially if your lengths start pulling brassy or your root shade looks dull.
- Schedule salon maintenance for major color changes, since dramatic shifts require professional correction rather than at-home fixes.
- Use hair masks to maintain softness, since colored hair needs extra moisture to stay healthy and vibrant-looking.
According to the American Academy of Dermatology, sticking to even a few of these habits can significantly stretch out the time between salon visits.
How to Maintain Shadow Root Hair at Home
Between appointments, a little consistency keeps the blend looking intentional instead of grown out and faded.
Stick with sulfate-free or color-safe shampoo, since sulfates strip color fast and can make your root shade fade unevenly against your lengths.
I also try to space out washes where I can, since more frequent washing means more frequent fading no matter which products I use.
Heat styling is the other big factor. Repeated heat exposure breaks down color molecules over time, so dialing back the flat iron or blow dryer helps the depth at your root stay true longer.
If your lengths start pulling brassy or warm, a purple or blue toning shampoo once a week can correct that without needing a salon visit.
And a hydrating hair mask once or twice a week keeps color-treated strands from drying out, which matters since dry hair tends to release color faster than well-moisturized hair.
How to Ask Your Stylist for a Shadow Root
Walking in with the right words makes a real difference in getting the result you actually want.
- Name the technique clearly: Mention that you want a shadow root, but explain your desired result since terms like root shadow and root smudge can vary between salons.
- Explain the look you want: Describe your goal, such as softer roots, a longer gap between touch-ups, or a more blended transition.
- Discuss depth and contrast: Tell your stylist how far you want the blend to go and if you prefer a subtle or noticeable root difference.
- Share your tone preference: Mention if you want cool ash, warm caramel, or another shade so the grow-out matches your style.
- Bring reference photos: Show two or three examples, preferably with similar hair length and texture, to help your stylist understand the target look.
A shadow root can refresh your color with a softer, more natural finish. The right technique and communication help create a blend that suits your style.
Can You Create Shadow Roots on Previously Colored Hair?
At-home application works fine if your hair has a fairly even color history and no major buildup from previous treatments. A simple, consistent base color makes blending predictable.
Uneven color history complicates things, since different sections can process color differently, leading to patchy or unexpected results. This is common if you have grown out highlights or box color layered over time.
Professional help is worth considering if you have multiple layers of previous color, damaged or overprocessed hair, or need a major color correction.
A stylist can assess your hair’s history and avoid outcomes that are hard to reverse at home.
Common Shadow Root Mistakes To Avoid
Even a simple technique like this comes with a few common slip-ups that can throw off the entire result.
- Choosing the wrong root shade: An overly dark color creates harsh contrast against your lengths instead of a soft fade, making regrowth look more obvious, not less.
- Applying color too far down the hair: Extending color beyond the root area shrinks the gradual zone, reducing the blended effect and leaving less room to soften transitions.
- Skipping the blending step: Without proper blending, you’re left with a defined line instead of a transition, defeating the entire purpose of the technique.
- Using permanent color unnecessarily: Permanent color near the root can create a harder edge as it grows out and is trickier to lighten later.
- Ignoring hair condition: Damaged hair absorbs color unevenly, leading to patchy results. Always assess hair health honestly before starting any root shadowing process.
Knowing these pitfalls ahead of time makes it much easier to get a result that actually looks the way you pictured it.
Final Thoughts
Shadow roots are one of those techniques that reward patience over speed. Rushing the blend is where most home attempts fall apart.
Once you get the color and placement correct, however, the maintenance work required is less demanding than for a total coloring project.
After a few rounds of trial and error on my own hair, my advice is to always start lighter than you think you need.
Test it for a trial week, take your time with each step, and you are bound to come up with natural-looking roots.
Frequently Asked Questions
Can I Do Shadow Roots at Home?
Yes, you can do shadow roots at home with proper shade selection, sectioning, and blending techniques.
Are Shadow Roots Damaging to Hair?
Damage depends on the products used and hair condition before coloring.
What Color Should I Use for Shadow Roots?
Choose a shade close to your natural root color for a soft and blended appearance.