In the most important moments of life, the right dress does far more than cover the body. It becomes a statement of identity, taste, and respect for the occasion. Whether you are walking down the aisle at your own wedding, standing by a close friend as a bridesmaid, attending a decisive job interview, or going on a first date that truly matters, a thoughtfully designed dress can help you stand out for the right reasons and feel fully prepared for the moment.
Instead of passively choosing from countless ready‑made options, more and more people are using digital tools to shape a dress around their own body, lifestyle, and aesthetic preferences. Many professional fashion designers now openly welcome client‑created digital sketches as the starting point for a custom design process.
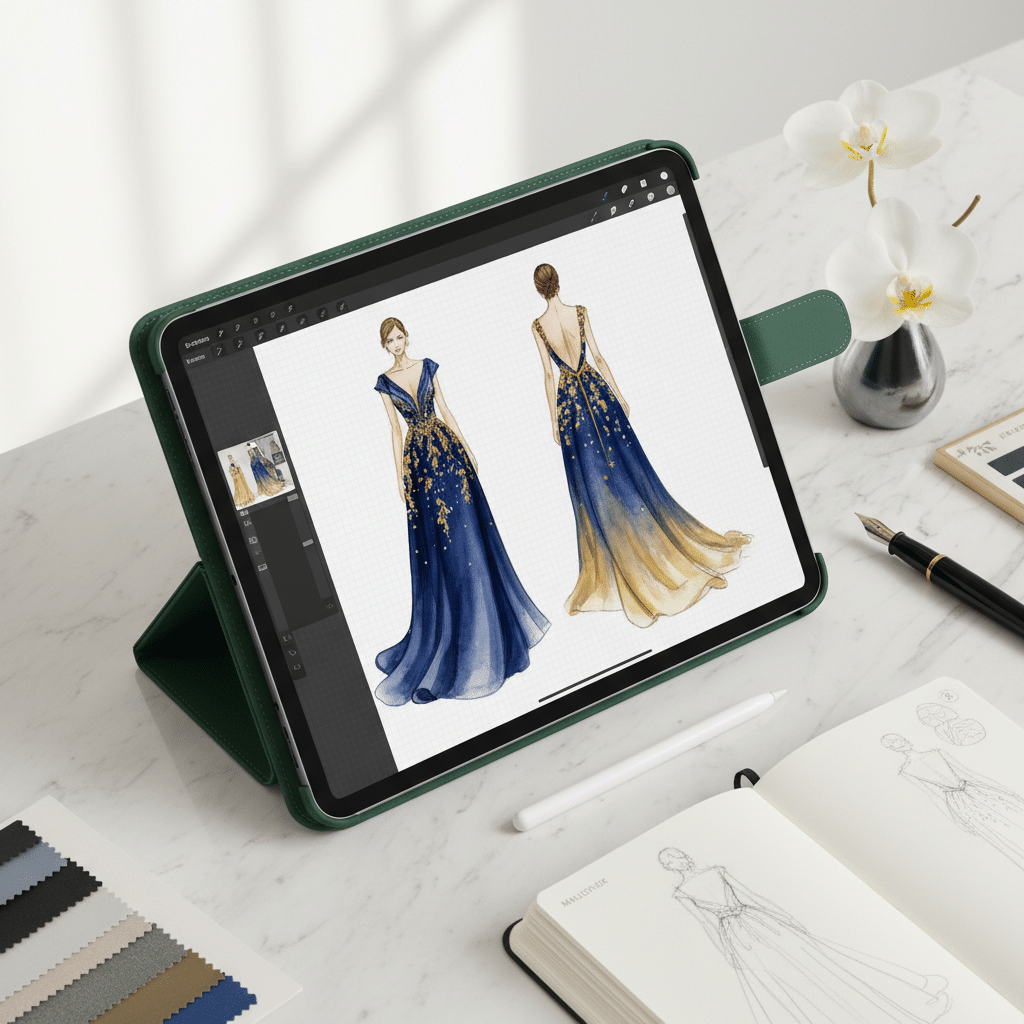
Why Use an I Pad for Dress Design
If you own a computer, or more simply an iPad, you already have the foundation needed to create professional‑looking fashion sketches. Compared with traditional pen and paper, drawing digitally makes it easier to revise, duplicate, and share your ideas without losing quality. You can experiment with silhouettes, colors, and details as many times as you like, without wasting materials.
An iPad is portable, so you can capture ideas whenever inspiration appears—on the couch, in a café, or during a trip. Many illustrators and fashion professionals now rely on tablets as their main sketching tool because digital workflows reduce revision time and make it simpler to communicate clearly with pattern makers, dressmakers, and manufacturers.
Hardware: Building a Practical Setup
Choosing the iPad
For fashion drawing, the device needs to support a pressure‑sensitive stylus and run modern drawing apps smoothly. The iPad Air (11‑inch) is a popular, budget‑friendlier option than the iPad Pro while still offering strong performance for illustration. It supports the second‑generation Apple Pencil, which delivers low latency and high accuracy that are important for crisp lines and subtle shading.
The iPad Pro line offers higher refresh rates and more advanced displays, which can benefit professionals working with very detailed, color‑critical artwork. However, for most custom dress sketches—especially at the concept stage—an iPad Air is sufficient in both power and screen quality. Entry‑level iPad models can also work for beginners who want to test digital drawing before investing more.
Stylus: Apple Pencil and alternatives
The second‑generation Apple Pencil remains the standard for drawing on newer iPad models. It attaches magnetically to the side of the iPad for charging and pairing, and it supports pressure and tilt, allowing you to vary line weight and simulate traditional pencils or markers. This makes it suitable for drawing figure proportions, fabric drape, and fine details such as lace, pleats, or buttons.
There are also third‑party styluses designed specifically for iPad. Some models, like ESR’s Geo series, integrate Apple’s Find My support so you can locate the stylus if it is misplaced. This tracking feature can be particularly useful for people who often work in shared spaces, commute with their devices, or tend to misplace small accessories.
Paper‑feel screen protector
Drawing directly on bare glass can feel slippery and unnatural to people used to sketching on paper. A “paper‑feel” screen protector adds a light texture that increases friction between the tip of the stylus and the display. This extra resistance can make strokes easier to control, especially for long, precise lines such as seams, hemlines, and darts.
Brands like ESR offer paper‑feel magnetic screen protectors designed for the iPad Air 11‑inch. These attach magnetically to the screen so you can put them on when drawing and remove them quickly when you prefer the smooth glass experience for viewing photos or watching video. Some versions are also compatible with a thin tempered glass protector underneath, allowing users to combine permanent impact protection with a removable textured surface for art. This flexibility is convenient for people who switch frequently between design work and everyday tablet use.
Another practical advantage of paper‑feel protectors is reduced glare. The matte surface diffuses reflections from overhead lights or windows, making it easier on the eyes during long sketching sessions. This can help maintain focus and comfort when refining intricate dress details or color variations.
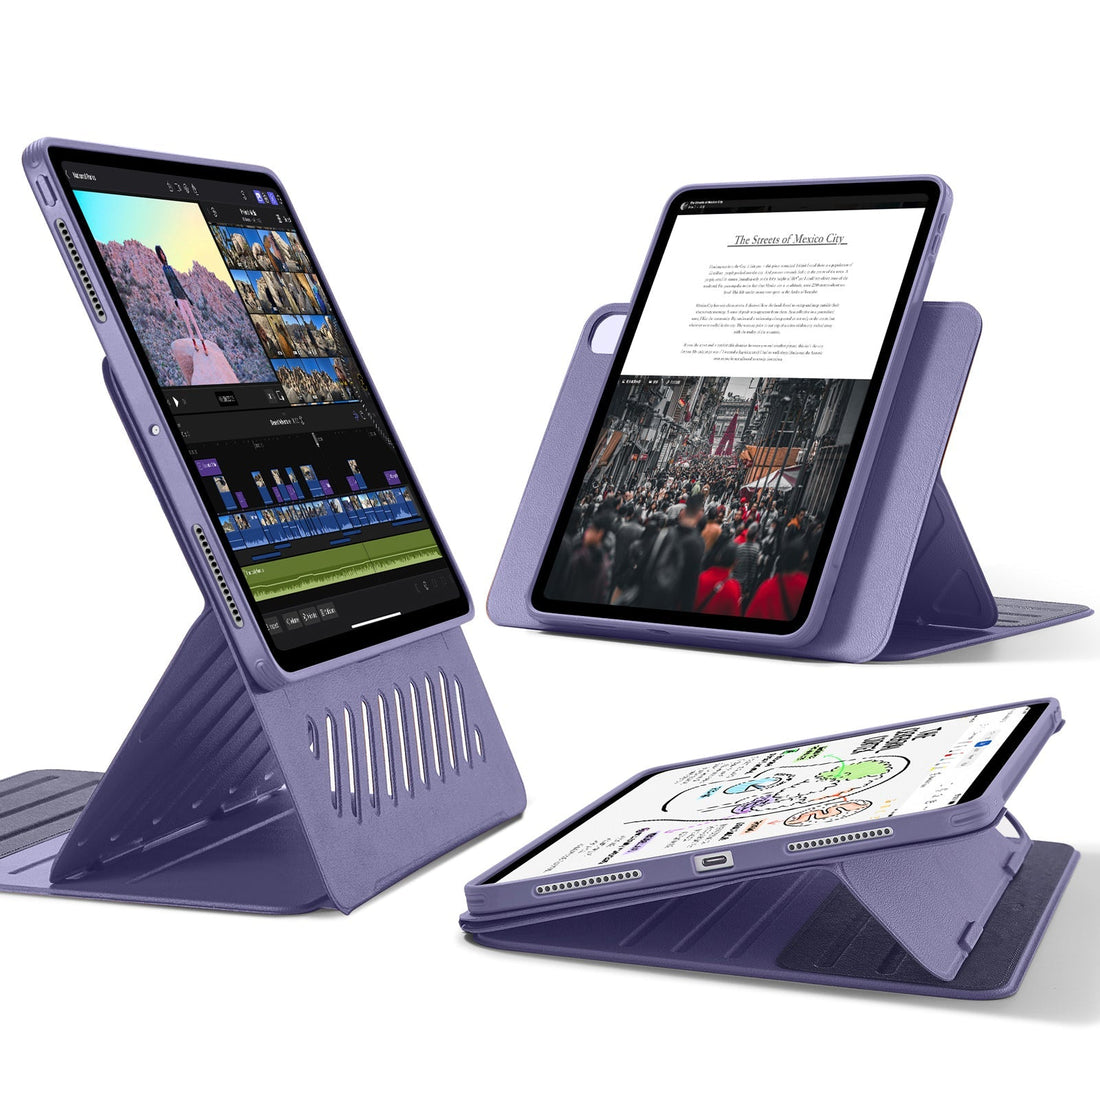
iPad case with stand and pencil storage
Posture matters when drawing for extended periods. A case with an integrated stand allows you to position the iPad at different angles for sketching, reviewing, or typing. ESR’s Shift Magnetic case for the iPad Air 11‑inch, for example, is designed with a dual‑stand structure that can be adjusted into multiple viewing and writing angles using magnetic grooves. This kind of multi‑angle support lets you find a comfortable position whether you are sitting upright at a desk or leaning over a table while working on more precise strokes.
The Shift Magnetic case is also built as a two‑part system: a slim inner shell that can stay on the device and a detachable magnetic cover that adds full 360‑degree protection when needed. For dress design, this means you can remove the outer cover to reduce bulk and get closer to the screen while drawing, then reattach it when transporting the iPad in a bag. Cases with pencil holders or magnetic attachment points also help keep your stylus secure and within reach, reducing the risk of loss or damage during daily use.
Software: Applications for Sketching and Layout
Once the hardware is set, the next step is choosing the right apps. Several widely used drawing and design applications work well for fashion sketches:
- Procreate is a one‑time‑purchase drawing app favored by many artists for its simple interface and rich brush engine. It supports multiple layers, custom brushes, and high‑resolution canvases, which make it ideal for building clean front and back views of a dress, plus close‑up views of details.
- Adobe Fresco is a good option for users already in the Adobe ecosystem. It integrates with other Adobe tools and offers both raster and vector‑like brushes, which can be useful for mixing expressive sketching with crisp outlines.
- Affinity Designer or other vector‑drawing tools are helpful when you want technical‑style drawings with exact curves and shapes for communication with pattern makers or manufacturers.
Each of these apps allows you to use layers strategically: one for the body template, one for the garment outline, another for fabric texture or embellishment, and additional layers for notes and measurements. This non‑destructive workflow makes it easy to adjust only one aspect of the design at a time.
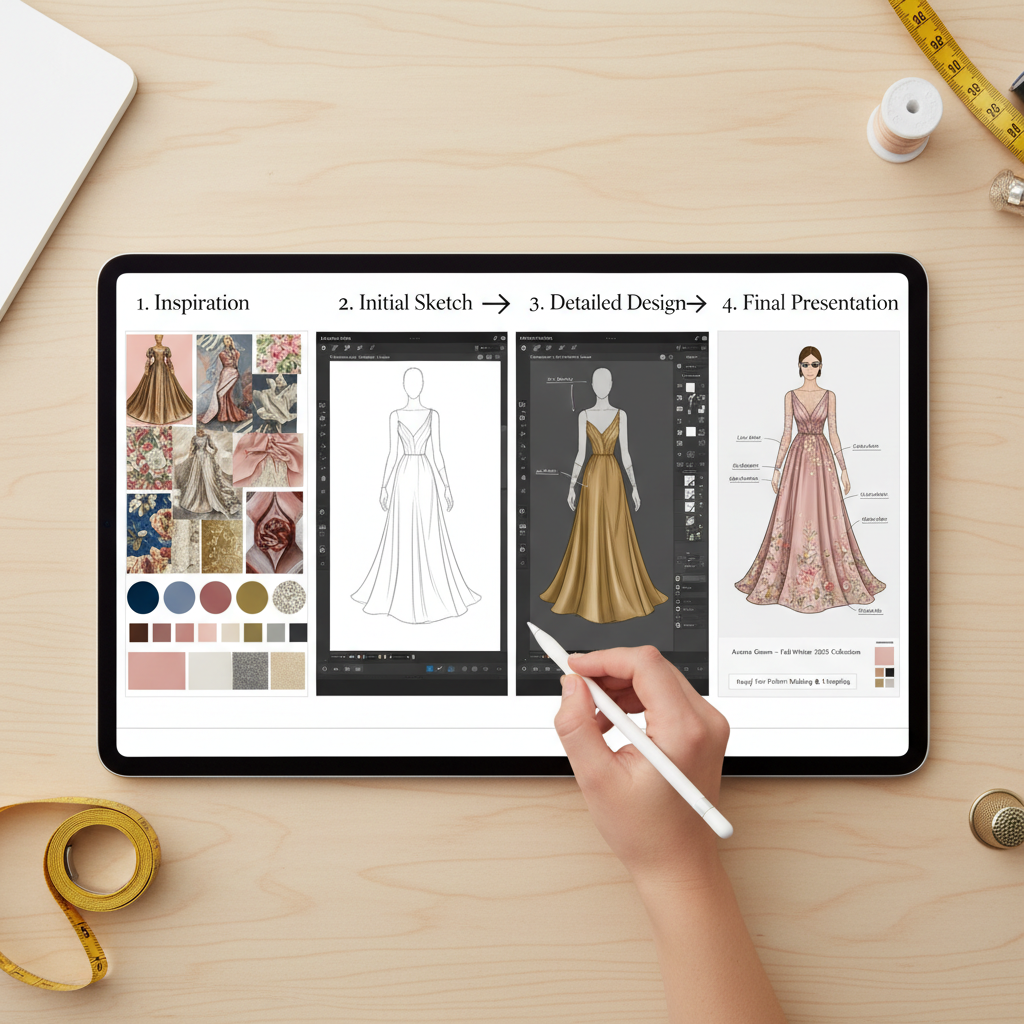
A Practical Workflow for Designing Your Dress
1. Clarify the occasion and role
Before opening any app, define the context. Are you the bride, a guest, a bridesmaid, an interviewee, or heading to a first date? Each scenario sets different expectations for formality, color, and silhouette. Weddings often require adherence to dress codes or cultural norms, while interviews typically favor more conservative lines and muted tones. First dates leave more space for personal expression but still benefit from thoughtful balance between comfort and sophistication.
2. Gather references and inspiration
Create a digital mood board by collecting reference images: runway looks, red‑carpet outfits, vintage patterns, fabric close‑ups, and color palettes. Many people use Pinterest, fashion websites, or digital magazines for this step. Import screenshots or photos into your drawing app or a separate board so they remain visible while sketching. This will help guide choices about neckline, sleeve length, skirt volume, and decorative elements that match both your taste and the occasion.
3. Start with a body template (croquis)
Fashion sketches are easier to interpret when the garment is shown on a human figure rather than floating on a blank page. You can either draw a simple figure yourself or import a pre‑made fashion croquis as a base layer. Keep the proportions consistent so different design ideas can be compared easily. Reduce the figure to a light, almost transparent layer, then draw the dress over it on a new layer.
4. Block in the silhouette
Using a simple brush, outline the primary shape of the dress: neckline, shoulders, waist placement, skirt style, and length. At this stage, focus on balance and overall flow instead of details. A clean silhouette that suits your body proportions and the nature of the event will be far more effective than a piece overloaded with decoration. Try a few variations on separate layers or separate canvases: for example, one A‑line version, one mermaid shape, and one column dress, then compare how each matches your intended message—confident, romantic, understated, or bold.
5. Add structure and fabric behavior
Once the basic outline feels right, think about how fabric behaves in real life. Heavy materials drape differently from light, sheer ones; structured textiles like taffeta hold more volume than silk. Use line quality and shading on the iPad to hint at folds, gathers, and movement. Clear indications of darts, seams, and panels help a professional designer or dressmaker understand how to translate your idea into pattern pieces.
6. Apply color and materials notes
Create separate layers for color so you can test options without redrawing the whole dress. Use simple, flat fills first, then refine with gradients or texture brushes if needed. Next to each major color area, write short notes: color names, possible Pantone references, and fabric choices such as satin, chiffon, lace, or crepe. These annotations become very helpful later when you discuss pricing, sourcing, and comfort with your designer.
7. Prepare front, back, and detail views
For serious occasions like weddings or custom eveningwear, a single front view is rarely enough. Prepare at least:
- A front view showing the overall impression and key design lines
- A back view highlighting closures, back neckline, train, or unique elements
- Close‑up panels for special features such as embroidery, beading, or unusual draping
Using layers or separate canvases in the same app makes it straightforward to keep these views consistent. Export them together as a multi‑page PDF or a set of high‑resolution images for sharing.
Presenting Your Design to A Professional
Many custom bridal and eveningwear studios describe on their websites how clients can submit sketches or inspiration boards as a starting point. Clear digital drawings from your iPad can therefore streamline your first consultation.
When you are ready to contact a designer or atelier, prepare a small digital package that includes:
- Your front, back, and detail sketches in a clear format
- A short written description of the occasion, date, venue type, and your role
- Color and fabric preferences, including any must‑avoid materials
- Rough measurements if available, such as bust, waist, hips, height, and desired skirt length
During the consultation—either in person or online—the designer can review your visuals, point out what is structurally realistic, and suggest refinements. Professional input may adjust proportions, change certain fabrics for better movement, or simplify construction to keep costs reasonable. Your iPad sketches do not replace the designer’s expertise; instead, they help ensure both sides start from a shared vision.
Depending on complexity, the full process from confirmed design to finished garment can take several months. This often includes concept refinement, fabric sourcing, test garments (toiles or muslins), fitting sessions, adjustments, and final finishing. Planning your custom dress well in advance of the event ensures there is time to solve any fit or comfort issues without last‑minute stress.
Why This Digital Approach Matters
Using an iPad, stylus, paper‑feel screen protector, and a well‑designed case with stand turns dress design from something distant and exclusive into a practical, accessible process. You gain the ability to:
- Explore ideas visually before committing to fabric or labor
- Communicate more clearly and efficiently with professionals
- Make edits without starting over from scratch
- Preserve a detailed visual record of your concept for future projects
Most importantly, you step into important moments wearing a dress that reflects who you are and what you value, rather than what happened to be in stock. The technology does not replace craftsmanship; it enhances collaboration between you and the designer so that, when the big day arrives, your dress feels both deeply personal and perfectly suited to the occasion.